VFIO with Archlinux
March 2021
During recent times I got more and more annoyed with dual booting and I decided that, as I wanted to build a new rig anyways, I want to give GPU-Passthrough a try. There were some big steps in the virtualization corner the recent few years and the current state is actually a very decent alternative these days. By having multiple GPUs, one for you host and one which is handed over to your VM, you can actually achieve close to bare metal performance inside your vm. The entire thing is easy to setup, tiresome to iron out and optimize. As there are already some great guides which also go indepth about the general configuration I wont be talking about that here. Instead I just want to give a quick overview over my specs, what I configured for my VM, what problems I ran into, how I solved them and what the performance of my VM is currently. Although at this stage, optimization is still ongoing and I am still benchmarking certain configurations.
My Specs
- Arch Linux
- AMD Ryzen Threadripper 1950X (32) @ 3.400GHz
- AMD RX 590
- AMD RX 580
- 64GB RAM
General Setup // Setting up your VM
The Archlinux wiki is a great place to get started with the initial configuration: Configuring the correct bios settings, passing the gpu and common optimization measures.
CPU Pinning
https://libvirt.org/formatdomain.html#elementsCPUAllocation
You most likely want to pin your host CPUs to CPUs from your VM. By default, the linux scheduler would use any available core from your host CPU to process tasks, which can lead to a heavy performancy loss. By pinning one host core to one virtual core from the VM, you avoid that issue.
One thing to be aware of is that you’re pinning the correct cores when you have a cpu with hyperthreading. When in hyperthreading mode, one physical CPU core is split into two cpus, which can simultaneously process the datastream.
Depending on your CPU Architecture, one core is either made up from sequential processing units or alternatively follow a different pattern
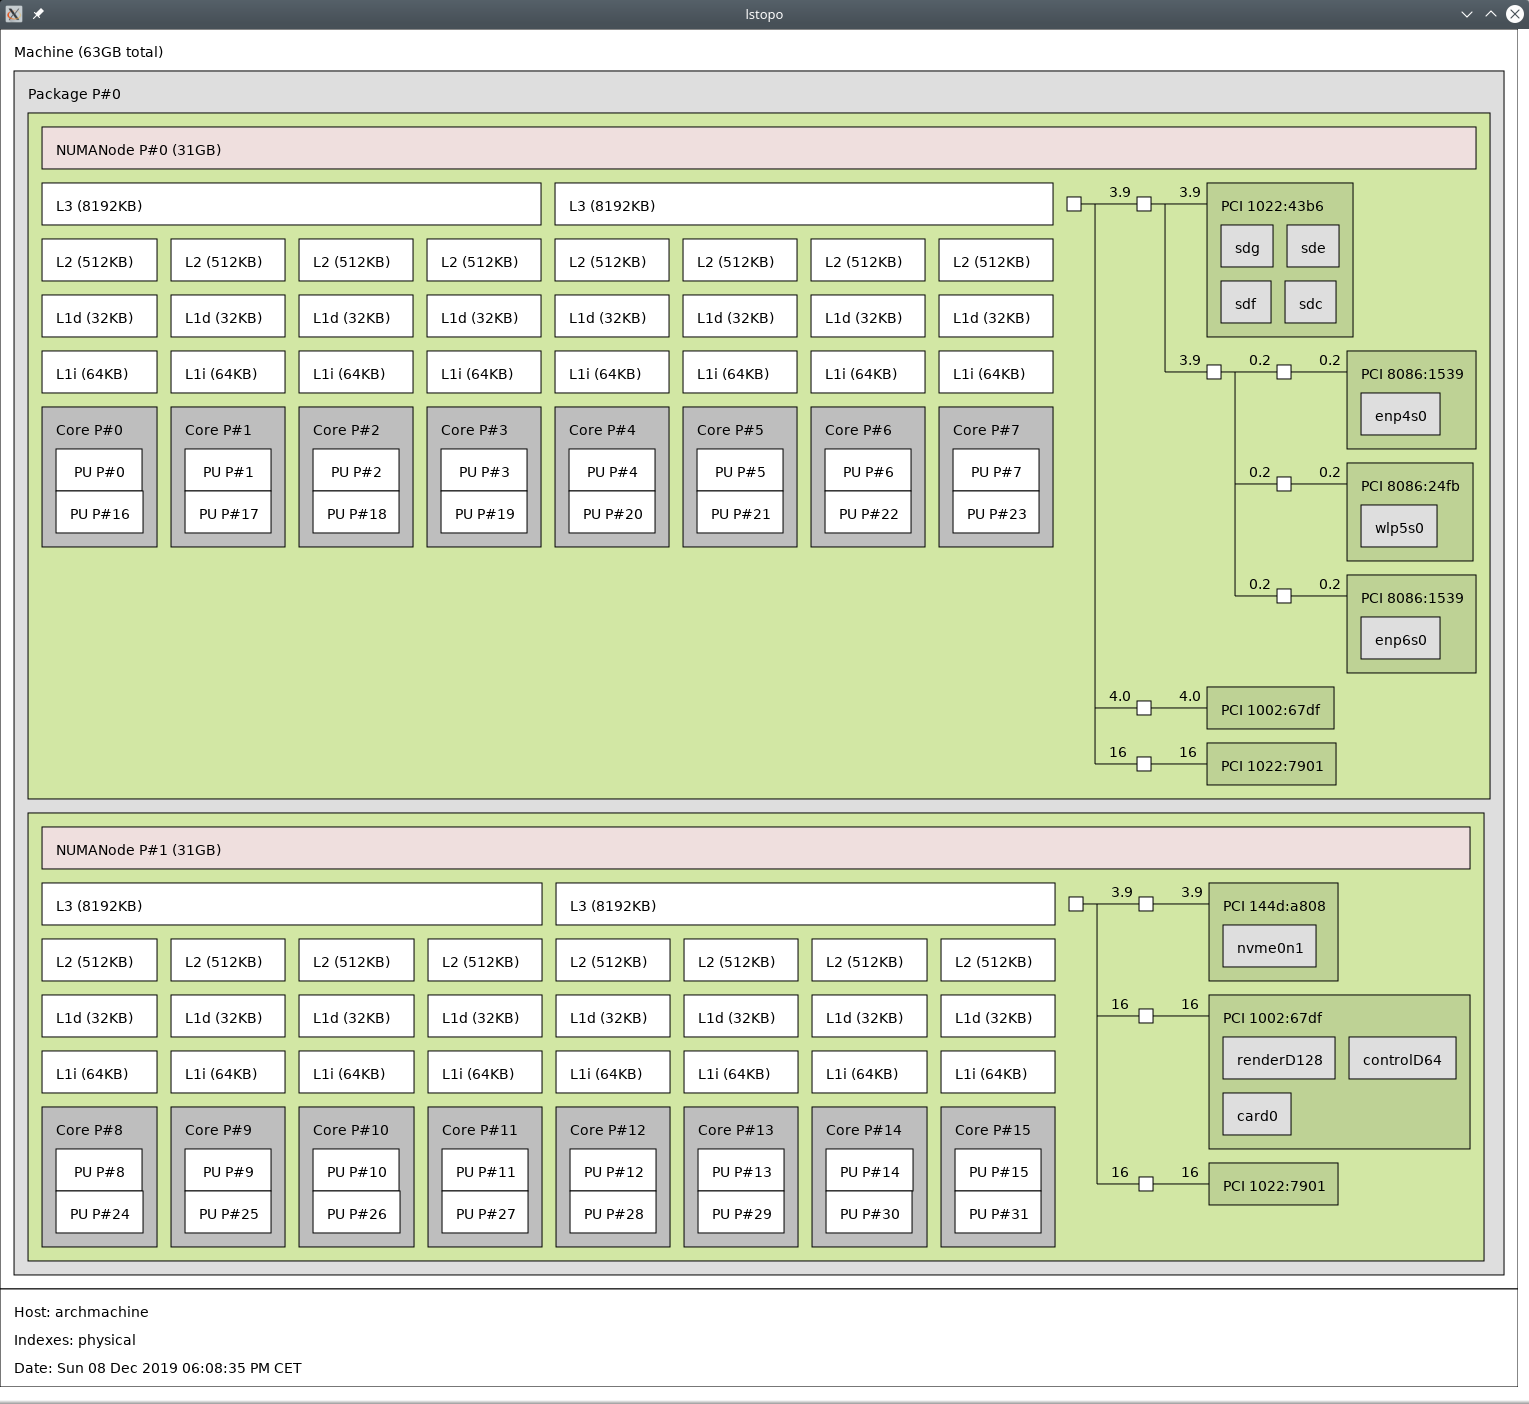
Example: as seen on the screenshot, the first core of my cpu contains the processing units #0 and #16 and not, as opposed to in most intel cpus, #0 and #1. So I need to make sure to pin the processing unit #0 and #16 as the first two cores to the VM.
Relevant XML snippet:
  <cputune>
    <vcpupin vcpu="0" cpuset="12"/>
    <vcpupin vcpu="1" cpuset="28"/>
    <vcpupin vcpu="2" cpuset="13"/>
    <vcpupin vcpu="3" cpuset="29"/>
    <vcpupin vcpu="4" cpuset="14"/>
    <vcpupin vcpu="5" cpuset="30"/>
    <vcpupin vcpu="6" cpuset="15"/>
    <vcpupin vcpu="7" cpuset="31"/>
    <emulatorpin cpuset="13-15,29-31"/>
  </cputune>
You want to make sure to pin the same processing units which make up one host core to one core inside the vm.
Memory Pinning
One thing which the Archwiki actually does not go into is memory pinning on cpus with multiple numa nodes.
When there are multiple numa nodes, you will have cpu cores which have faster access to certain memory regions than other cores and vice versa. This means you want to pin the cpu cores from one numa node to your VM and you want the vm to also allocate all the memory from that numa node. This can simply be done with a three liner in your xml settings:
  <numatune>
    <memory mode="strict" nodeset="1"/>
  </numatune>
Which leads to memory only being allocated from numa node 1.
If you take a look at the above image from my topography again, you’ll see that every CPU I pinned to the VM belongs to numa node 1, since I instructed the VM to only allocate memory there.
Looking Glass // Alternatives
I tried out Looking Glass first, as it was pretty hyped around its release. Unfortunately I ran into quite some issues, including that Looking Glass is not able to capture certain protected windows like the Logon Screen or the UAC Window.
The Windows Logon Screen, Shutdown, UAC Dialogs, Ctrl+Alt+Del, LockScreen do not work.
These screens are on the “Secure Desktop”, Microsoft has intentionally limited access to capture this screen to prevent malware attempting to capture information from these screens that might be sensitive. There is little we can do here unless Microsoft are willing to let us sign the host application as an ‘Accessibility’ program.
Users of NVIDIA cards that support the NVidia Capture API (Quadro, Tesla, etc) will find this limitation only applies to the Windows Logon Screen and Shutdown Screens, the NvFBC capture API is able to capture the “Secure Desktop” outside of Microsoft’s control.
I did not find any other viable solution other than using a DisplayPort-Switch. I did find a relatively cheap one on amazon which, so far, is working fine. The only caveat is, that due to how DisplayPort works, switching to the VM Monitor means that the monitor completely disconnects from my host machine and the windows will be rearranged. This would not happen with hdmi.
Input Passing
Another major building block for getting the entire setup to work is passing your input to your vm. For this, there are a plethora of options which vary in quality.
Popular options are:
- Software solution, basically transfering your input via network
- Using a mouse/keyboard switch
- Using evdev passthrough
Personally I went with evdev passthrough. Its low latency to the point where I do not feel a difference and it is directly integrated into the Linux kernel and QEMU.
Sound
For sound there are once again multiple solutions. You can pass your sound device to your VM, which also means that you dont have any sound output on your host now. I found a great low latency solution called scream which, in one of their newer updates, also provides the option to send the audio data via shared memory instead of network to the host.
In addition to that, I wrote myself a little script to toggle the sound on or off
#!/bin/bash
FILE_LOCATION='/tmp/VM_SOUND_PID'

isRunning() {
    test -f $FILE_LOCATION
}

if isRunning; then
    kill $(cat $FILE_LOCATION)
    rm $FILE_LOCATION
else
    scream-ivshmem-pulse /dev/shm/scream-ivshmem &
    echo $! > $FILE_LOCATION
fi
and bound it to a global hotkey in kde.
Updating drivers
After installing your GPU driver, the next thing you want to do is to install all virtio drivers which you can download here.
Measure your DPC / ISR Latency
You want to make sure that your DPC and ISR latency is as low as possible.
You can measure it with LatencyMon. Before Windows 10 there was also another tool called DPCLatency, which is not accurate anymore on the latest windows version.
Having a high DPC and ISR Latency can have a variety of reasons. I brought mine down successfully by installing all drivers and disabling services and unneeded devices.
I still experience a spike every few dozen minutes which I did not find the cause for so far, but its not recognizable when playing games.
The DPC/ISR latencies are extremely setup-dependant and there is no silver bullet for a problem.
XML Scheme
My current XML looks like this:
<domain xmlns:qemu="http://libvirt.org/schemas/domain/qemu/1.0" type="kvm">
  <name>WindowsTemplate</name>
  <uuid>717ffdb2-bc6e-420a-87a5-e3dbdcc2849b</uuid>
  <metadata>
    <libosinfo:libosinfo xmlns:libosinfo="http://libosinfo.org/xmlns/libvirt/domain/1.0">
      <libosinfo:os id="http://microsoft.com/win/10"/>
    </libosinfo:libosinfo>
  </metadata>
  <memory unit="KiB">16777216</memory>
  <currentMemory unit="KiB">16777216</currentMemory>
  <memoryBacking>
    <nosharepages/>
    <locked/>
    <access mode="private"/>
    <allocation mode="immediate"/>
  </memoryBacking>
  <vcpu placement="static">8</vcpu>
  <cputune>
    <vcpupin vcpu="0" cpuset="12"/>
    <vcpupin vcpu="1" cpuset="28"/>
    <vcpupin vcpu="2" cpuset="13"/>
    <vcpupin vcpu="3" cpuset="29"/>
    <vcpupin vcpu="4" cpuset="14"/>
    <vcpupin vcpu="5" cpuset="30"/>
    <vcpupin vcpu="6" cpuset="15"/>
    <vcpupin vcpu="7" cpuset="31"/>
    <emulatorpin cpuset="13-15,29-31"/>
  </cputune>
  <numatune>
    <memory mode="strict" nodeset="1"/>
  </numatune>
  <os>
    <type arch="x86_64" machine="pc-q35-4.0">hvm</type>
    <loader readonly="yes" type="pflash">/usr/share/ovmf/x64/OVMF_CODE.fd</loader>
    <nvram>/var/lib/libvirt/qemu/nvram/win10_real_VARS.fd</nvram>
  </os>
  <features>
    <acpi/>
    <apic/>
    <hyperv>
      <relaxed state="on"/>
      <vapic state="on"/>
      <spinlocks state="on" retries="8191"/>
    </hyperv>
    <vmport state="off"/>
  </features>
  <cpu mode="host-passthrough" check="none" migratable="on">
    <topology sockets="1" dies="1" cores="4" threads="2"/>
    <feature policy="require" name="topoext"/>
  </cpu>
  <clock offset="localtime">
    <timer name="rtc" tickpolicy="catchup"/>
    <timer name="pit" tickpolicy="delay"/>
    <timer name="hpet" present="no"/>
    <timer name="hypervclock" present="yes"/>
  </clock>
  <on_poweroff>destroy</on_poweroff>
  <on_reboot>restart</on_reboot>
  <on_crash>destroy</on_crash>
  <pm>
    <suspend-to-mem enabled="no"/>
    <suspend-to-disk enabled="no"/>
  </pm>
  <devices>
    <emulator>/usr/bin/qemu-system-x86_64</emulator>
    <disk type="block" device="disk">
      <driver name="qemu" type="raw"/>
      <source dev="/dev/Windows/WindowsTemplate"/>
      <target dev="sda" bus="sata"/>
      <boot order="1"/>
      <address type="drive" controller="0" bus="0" target="0" unit="0"/>
    </disk>
    <disk type="file" device="cdrom">
      <driver name="qemu" type="raw"/>
      <source file="/home/mydayyy/Downloads/Win10_2004_English_x64.iso"/>
      <target dev="sdb" bus="sata"/>
      <readonly/>
      <address type="drive" controller="0" bus="0" target="0" unit="1"/>
    </disk>
    <controller type="usb" index="0" model="qemu-xhci" ports="15">
      <address type="pci" domain="0x0000" bus="0x02" slot="0x00" function="0x0"/>
    </controller>
    <controller type="sata" index="0">
      <address type="pci" domain="0x0000" bus="0x00" slot="0x1f" function="0x2"/>
    </controller>
    <controller type="pci" index="0" model="pcie-root"/>
    <controller type="pci" index="1" model="pcie-root-port">
      <model name="pcie-root-port"/>
      <target chassis="1" port="0x10"/>
      <address type="pci" domain="0x0000" bus="0x00" slot="0x02" function="0x0" multifunction="on"/>
    </controller>
    <controller type="pci" index="2" model="pcie-root-port">
      <model name="pcie-root-port"/>
      <target chassis="2" port="0x11"/>
      <address type="pci" domain="0x0000" bus="0x00" slot="0x02" function="0x1"/>
    </controller>
    <controller type="pci" index="3" model="pcie-root-port">
      <model name="pcie-root-port"/>
      <target chassis="3" port="0x12"/>
      <address type="pci" domain="0x0000" bus="0x00" slot="0x02" function="0x2"/>
    </controller>
    <controller type="pci" index="4" model="pcie-root-port">
      <model name="pcie-root-port"/>
      <target chassis="4" port="0x13"/>
      <address type="pci" domain="0x0000" bus="0x00" slot="0x02" function="0x3"/>
    </controller>
    <controller type="pci" index="5" model="pcie-root-port">
      <model name="pcie-root-port"/>
      <target chassis="5" port="0x14"/>
      <address type="pci" domain="0x0000" bus="0x00" slot="0x02" function="0x4"/>
    </controller>
    <controller type="pci" index="6" model="pcie-root-port">
      <model name="pcie-root-port"/>
      <target chassis="6" port="0x8"/>
      <address type="pci" domain="0x0000" bus="0x00" slot="0x01" function="0x0" multifunction="on"/>
    </controller>
    <controller type="pci" index="7" model="pcie-root-port">
      <model name="pcie-root-port"/>
      <target chassis="7" port="0x9"/>
      <address type="pci" domain="0x0000" bus="0x00" slot="0x01" function="0x1"/>
    </controller>
    <controller type="pci" index="8" model="pcie-to-pci-bridge">
      <model name="pcie-pci-bridge"/>
      <address type="pci" domain="0x0000" bus="0x06" slot="0x00" function="0x0"/>
    </controller>
    <controller type="scsi" index="0" model="virtio-scsi">
      <address type="pci" domain="0x0000" bus="0x03" slot="0x00" function="0x0"/>
    </controller>
    <controller type="virtio-serial" index="0">
      <address type="pci" domain="0x0000" bus="0x07" slot="0x00" function="0x0"/>
    </controller>
    <interface type="network">
      <mac address="52:54:00:08:34:5b"/>
      <source network="default"/>
      <model type="virtio"/>
      <address type="pci" domain="0x0000" bus="0x01" slot="0x00" function="0x0"/>
    </interface>
    <serial type="pty">
      <target type="isa-serial" port="0">
        <model name="isa-serial"/>
      </target>
    </serial>
    <console type="pty">
      <target type="serial" port="0"/>
    </console>
    <input type="mouse" bus="ps2"/>
    <input type="keyboard" bus="ps2"/>
    <input type="mouse" bus="virtio">
      <address type="pci" domain="0x0000" bus="0x00" slot="0x0e" function="0x0"/>
    </input>
    <input type="keyboard" bus="virtio">
      <address type="pci" domain="0x0000" bus="0x00" slot="0x0f" function="0x0"/>
    </input>
    <hostdev mode="subsystem" type="pci" managed="yes">
      <source>
        <address domain="0x0000" bus="0x08" slot="0x00" function="0x0"/>
      </source>
      <address type="pci" domain="0x0000" bus="0x05" slot="0x00" function="0x0"/>
    </hostdev>
    <redirdev bus="usb" type="spicevmc">
      <address type="usb" bus="0" port="2"/>
    </redirdev>
    <redirdev bus="usb" type="spicevmc">
      <address type="usb" bus="0" port="3"/>
    </redirdev>
    <memballoon model="virtio">
      <address type="pci" domain="0x0000" bus="0x04" slot="0x00" function="0x0"/>
    </memballoon>
    <shmem name="scream-ivshmem">
      <model type="ivshmem-plain"/>
      <size unit="M">2</size>
      <address type="pci" domain="0x0000" bus="0x00" slot="0x11" function="0x0"/>
    </shmem>
  </devices>
  <qemu:commandline>
    <qemu:arg value="-object"/>
    <qemu:arg value="input-linux,id=mouse1,evdev=/dev/input/by-id/usb-SteelSeries_SteelSeries_Rival_300_CS:GO_Hyperbeast_Edition-if01-event-mouse"/>
    <qemu:arg value="-object"/>
    <qemu:arg value="input-linux,id=kbd1,evdev=/dev/input/by-id/usb-Corsair_Corsair_Gaming_K70_LUX_RGB_Keyboard_1100C021AF0E98A85969FC68F5001BC7-if01-event-kbd,grab_all=on,repeat=on"/>
    <qemu:arg value="-cpu"/>
    <qemu:arg value="host,hv_time,kvm=off,hv_vendor_id=null,-hypervisor"/>
  </qemu:commandline>
</domain>
*The general term to describe the technique is actually SMT. Hyperthreading is Intel’s implementation of SMT because apparently they wanted to have their own name.